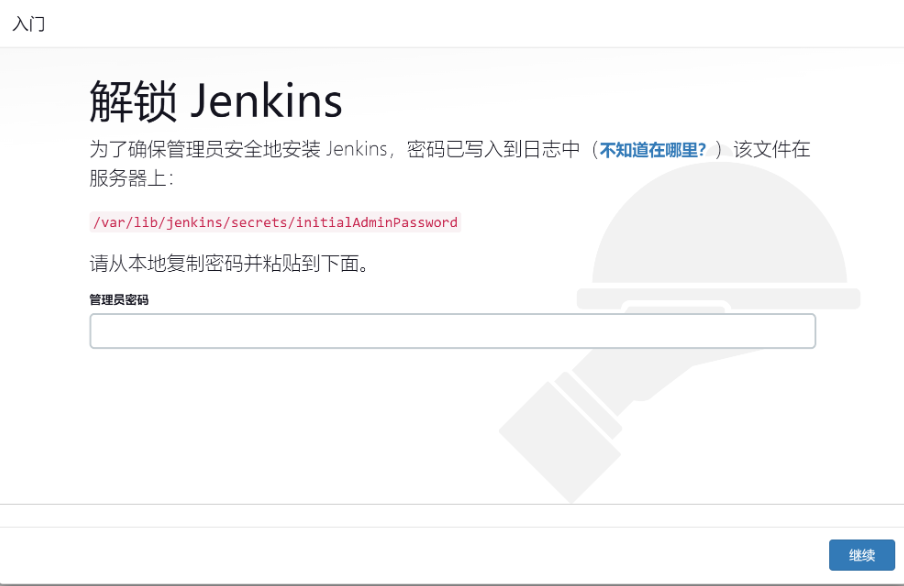
1)ubuntu阿里源
cat > /etc/apt/sources.list << EOF

deb https://mirrors.aliyun.com/ubuntu/ noble main restricted universe multiverse
deb-src https://mirrors.aliyun.com/ubuntu/ noble main restricted universe multiverse

deb https://mirrors.aliyun.com/ubuntu/ noble-security main restricted universe multiverse
deb-src https://mirrors.aliyun.com/ubuntu/ noble-security main restricted universe multiverse

deb https://mirrors.aliyun.com/ubuntu/ noble-updates main restricted universe multiverse
deb-src https://mirrors.aliyun.com/ubuntu/ noble-updates main restricted universe multiverse

# deb https://mirrors.aliyun.com/ubuntu/ noble-proposed main restricted universe multiverse
# deb-src https://mirrors.aliyun.com/ubuntu/ noble-proposed main restricted universe multiverse

deb https://mirrors.aliyun.com/ubuntu/ noble-backports main restricted universe multiverse
deb-src https://mirrors.aliyun.com/ubuntu/ noble-backports main restricted universe multiverse

EOF
sudo apt update
2)Centos阿里源
[base]
name=CentOS-$releasever - Base - mirrors.aliyun.com
baseurl=http://mirrors.aliyun.com/centos/$releasever/os/$basearch/
gpgcheck=1
gpgkey=http://mirrors.aliyun.com/centos/RPM-GPG-KEY-CentOS-7

[updates]
name=CentOS-$releasever - Updates - mirrors.aliyun.com
baseurl=http://mirrors.aliyun.com/centos/$releasever/updates/$basearch/
gpgcheck=1
gpgkey=http://mirrors.aliyun.com/centos/RPM-GPG-KEY-CentOS-7

[extras]
name=CentOS-$releasever - Extras - mirrors.aliyun.com
baseurl=http://mirrors.aliyun.com/centos/$releasever/extras/$basearch/
gpgcheck=1
gpgkey=http://mirrors.aliyun.com/centos/RPM-GPG-KEY-CentOS-7

[centosplus]
name=CentOS-$releasever - Plus - mirrors.aliyun.com
baseurl=http://mirrors.aliyun.com/centos/$releasever/centosplus/$basearch/
gpgcheck=1
enabled=0
gpgkey=http://mirrors.aliyun.com/centos/RPM-GPG-KEY-CentOS-7
wget -O /etc/yum.repos.d/CentOS-Base.repo http://mirrors.aliyun.com/repo/Centos-7.repo
sudo yum update