Ubuntu 24 构建 K8S 1.30高可用集群 – cri-dockerd
- 前言
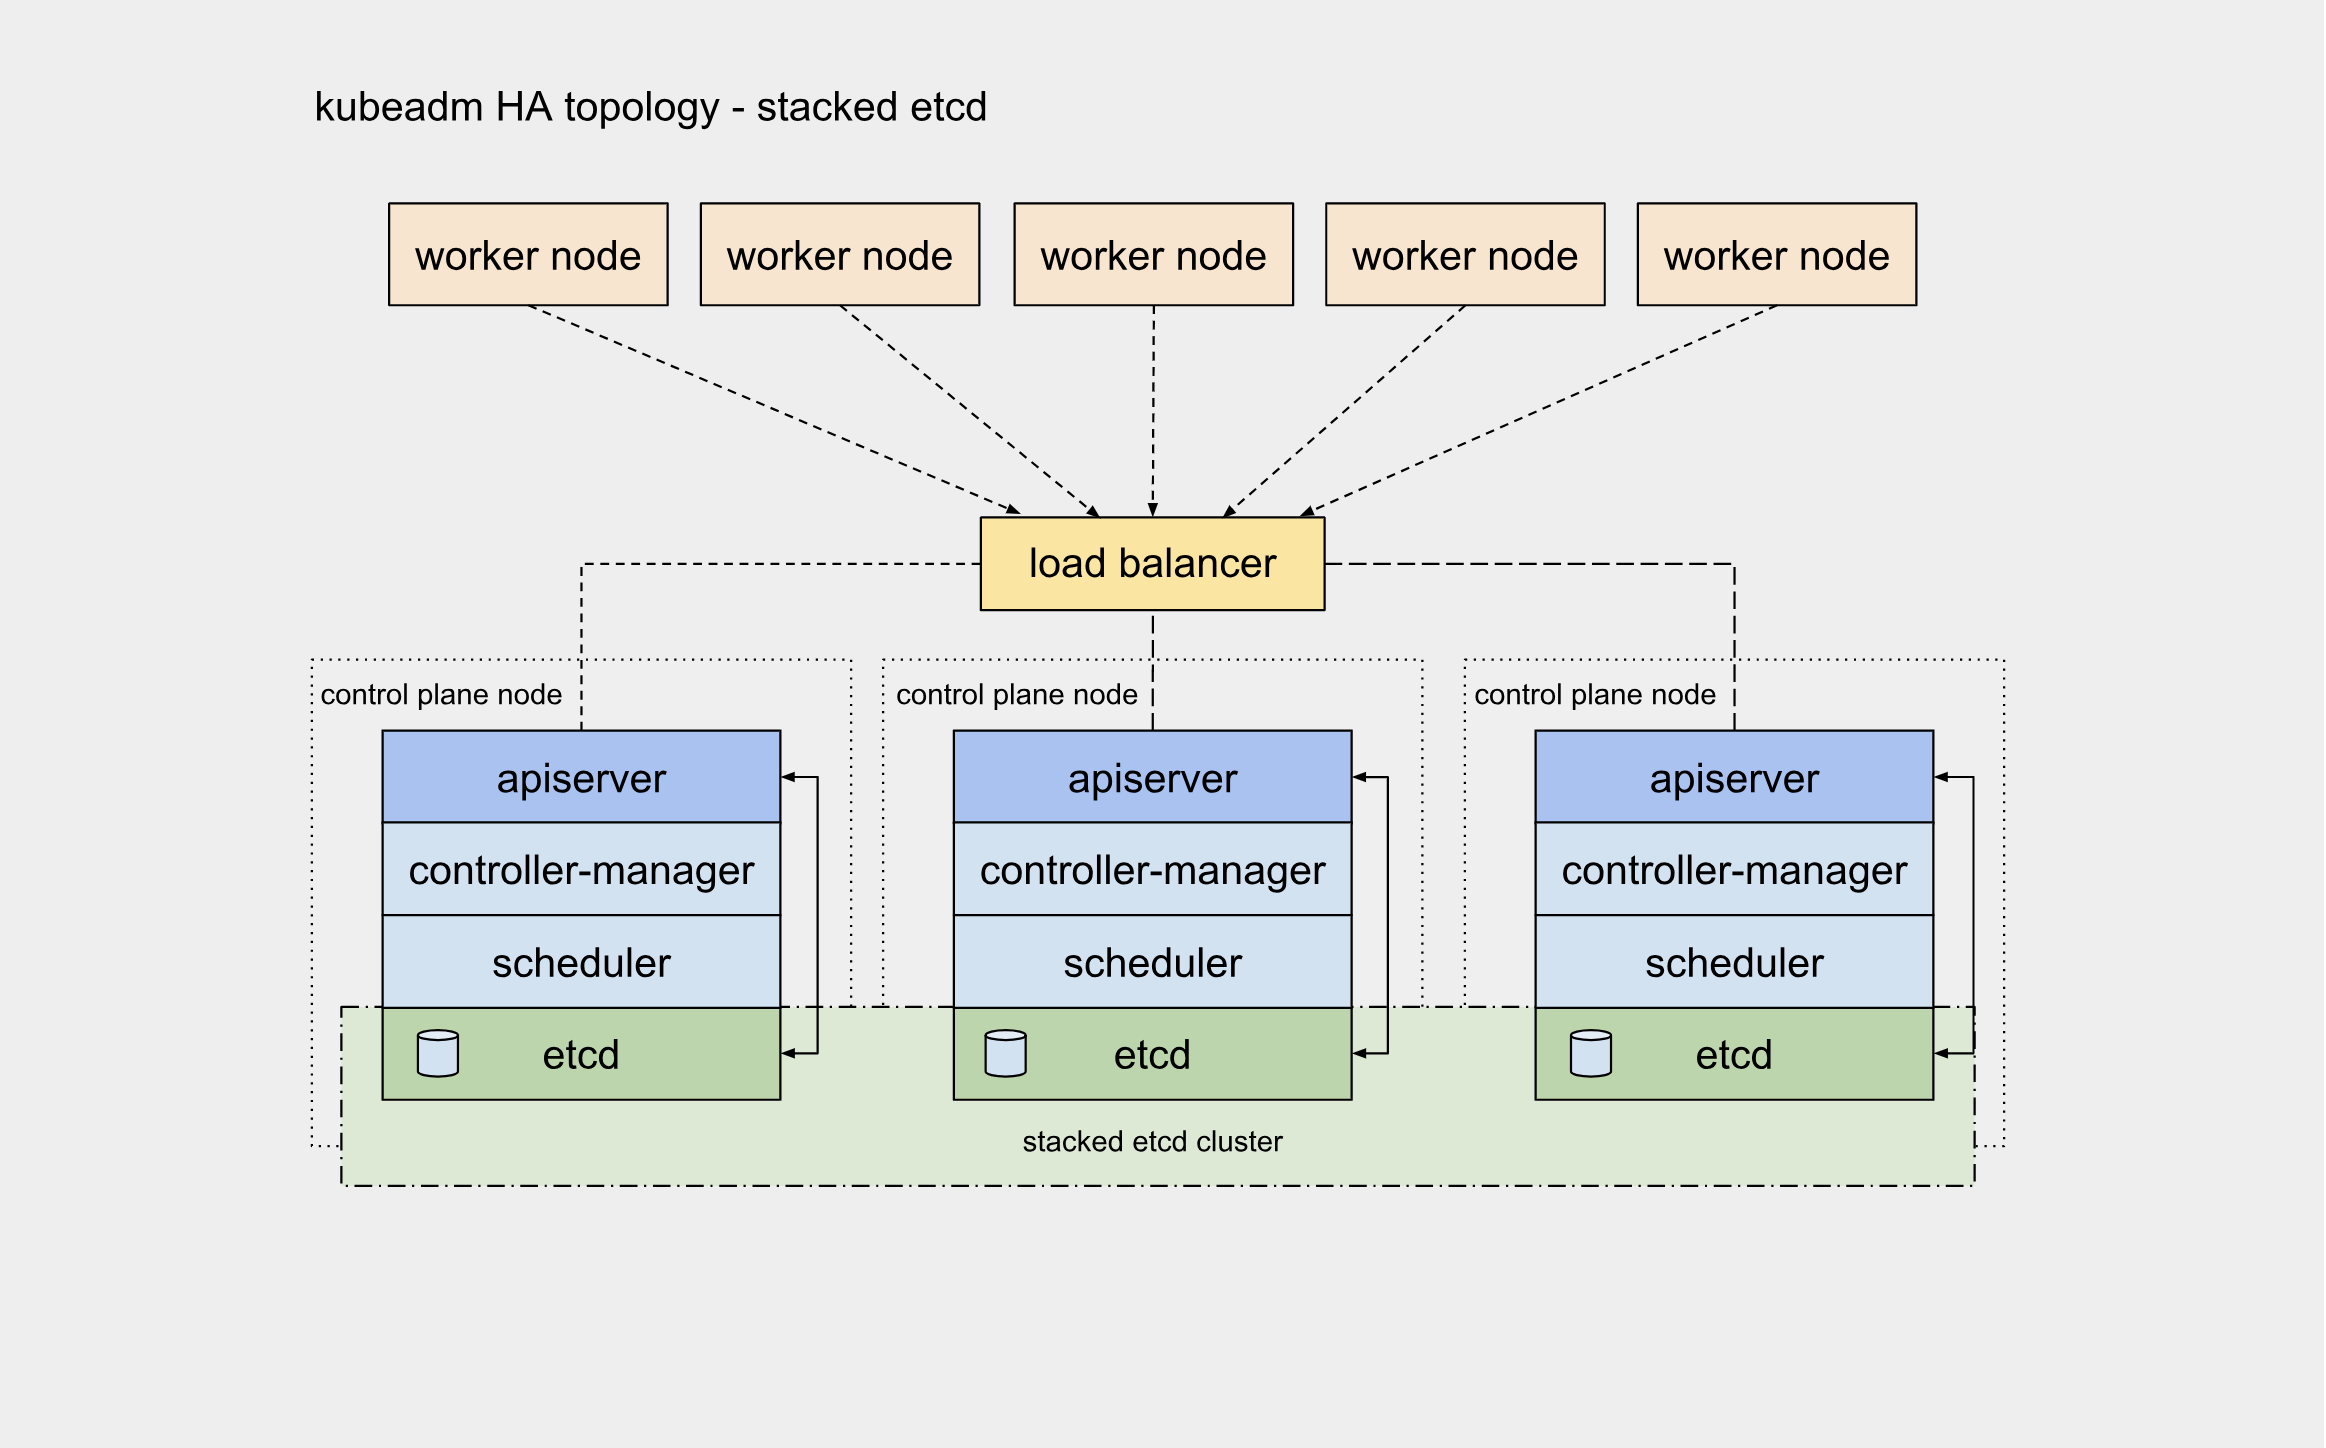
- 高可用集群规则
- 主机配置
- 集群配置
- 高可用集群规则
- 主机配置
| hostname | IP |
|---|---|
| k8s-master-1 | 172.18.188.140 |
| k8s-master-1 | 172.18.188.141 |
| k8s-master-1 | 172.18.188.142 |
| k8s-vip | 172.18.188.150 |
| k8s-node-1 | 172.18.188.143 |
备注:如果要加更多机器,配置一样
- 集群配置
| 配置信息 | 备注 |
|---|---|
| 系统版本 | ubuntu24.04 |
| Docker版本 | 最新 |
| cri-Dockerd版本 | 最新 |
| Pod网段 | 10.244.0.0/16 |
| Service网段 | 10.1.0.0/16 |
备注:主机网段、Service网段、Pod网段不能一样
一)环境配置
备注:环境配置可按照另外一个文章进行配置,配置都一样,额外注意一下就是,host解析和ssh配置即可:Ubuntu24.04 部署Kubernetes 1.30.13 – STARBUCKET
二)高可用组件安装
- master节点,安装keepalived和haproxy
apt install keepalived haproxy -y- master节点,配置haproxy,配置都一样
cat >/etc/haproxy/haproxy.cfg<<EOF
global
  maxconn  2000
  ulimit-n  16384
  log  127.0.0.1 local0 err
  stats timeout 30s

defaults
  log global
  mode  http
  option  httplog
  timeout connect 5000
  timeout client  50000
  timeout server  50000
  timeout http-request 15s
  timeout http-keep-alive 15s

frontend monitor-in
  bind *:33305
  mode http
  option httplog
  monitor-uri /monitor

frontend k8s-apiserver
  bind 0.0.0.0:8443
  bind 127.0.0.1:8443
  mode tcp
  option tcplog
  tcp-request inspect-delay 5s
  default_backend k8s-master

backend k8s-apiserver
  mode tcp
  option tcplog
  option tcp-check
  balance roundrobin
  default-server inter 10s downinter 5s rise 2 fall 2 slowstart 60s maxconn 250 maxqueue 256 weight 100
  server k8s-master-1 172.16.188.140:6443  check
  server k8s-master-2 172.16.188.141:6443  check
  server k8s-master-3 172.16.188.142:6443  check
EOF- 配置keepalived,k8s-master-1
cat > /etc/keepalived/keepalived.conf<<EOF

! Configuration File for keepalived
global_defs {
    router_id LVS_DEVEL
script_user root
    enable_script_security
}
vrrp_script chk_apiserver {
    script "/etc/keepalived/check_apiserver.sh"
    interval 5
    weight -5
    fall 2
rise 1
}
vrrp_instance VI_1 {
    state MASTER            #状态为MASTER,备节点状态需要为BACKUP
    interface ens160          #主机网卡
    mcast_src_ip 172.16.188.140
    virtual_router_id 51
    priority 100            #优先级为150,备节点的优先级必须比此数字低
    advert_int 1            #通信检查间隔时间1秒
    authentication {
        auth_type PASS
        auth_pass 1111
    }
    virtual_ipaddress {
        172.16.188.150
    }
    track_script {
       chk_apiserver    #模块
    }
}
EOF- 配置keepalived,k8s-master-2
cat > /etc/keepalived/keepalived.conf<<EOF

! Configuration File for keepalived
global_defs {
    router_id LVS_DEVEL
script_user root
    enable_script_security
}
vrrp_script chk_apiserver {
    script "/etc/keepalived/check_apiserver.sh"
    interval 5
    weight -5
    fall 2
rise 1
}
vrrp_instance VI_1 {
    state BACKUP            #状态为MASTER,备节点状态需要为BACKUP
    interface ens160
    mcast_src_ip 172.16.188.141
    virtual_router_id 51
    priority 50
    advert_int 1
    authentication {
        auth_type PASS
        auth_pass 1111
    }
    virtual_ipaddress {
        172.16.188.150
    }
    track_script {
       chk_apiserver    #模块
    }
}
EOF- 配置keepalived,k8s-master-3
cat > /etc/keepalived/keepalived.conf<<EOF

! Configuration File for keepalived
global_defs {
    router_id LVS_DEVEL
script_user root
    enable_script_security
}
vrrp_script chk_apiserver {
    script "/etc/keepalived/check_apiserver.sh"
    interval 5
    weight -5
    fall 2
rise 1
}
vrrp_instance VI_1 {
    state BACKUP            #状态为MASTER,备节点状态需要为BACKUP
    interface ens160
    mcast_src_ip 172.16.188.142
    virtual_router_id 51
    priority 50
    advert_int 1
    authentication {
        auth_type PASS
        auth_pass 1111
    }
    virtual_ipaddress {
        172.16.188.150
    }
    track_script {
       chk_apiserver    #模块
    }
}
EOF- master节点配置keepalived 检测脚本
cat > /etc/keepalived/check_apiserver.sh <<EOF
#!/bin/sh

errorExit() {


    echo "*** $*" 1>&2
    exit 1
}

curl --silent --max-time 2 --insecure https://localhost:8443/ -o /dev/null || errorExit "Error GET https://localhost:8443/"
if ip addr | grep -q 172.16.188.150; then
    curl --silent --max-time 2 --insecure https://172.16.188.150:8443/ -o /dev/null || errorExit "Error GET https://172.16.188.150:8443/"
fi
EOF

# 修改可执行权限
chmod +x /etc/keepalived/check_apiserver.sh- master节点启动keepalived和haproxy
systemctl enable keepalived
systemctl start keepalived
systemctl enable haproxy
systemctl start haproxy
# 查询服务运行状态
systemctl status keepalived
systemctl status haproxy


